Reference: Mark Haigh-Hutchinson. 2009. "Real-Time Cameras: A Guide for Game Designers and Developers." Elsevier.
 Scaling down the responsiveness in Editor Preferences.
 This post is the conclusion to a series intended to share knowledge I found in the resource John Nesky called the "only textbook" in the field of cameras for game design. The final nuggets of wisdom discuss fundamental aspects of any camera. Conveniently, I am beginning to build a new third person camera based on learnings from the Camera Experiments series, and these fundamentals are an excellent place to start - especially as I have neglected sharing them. or even thinking about them. for so long!
For the purpose of keeping this discussion quick and to the point, I have chosen to focus on mouse control schemes only. This is a quick primer on how to start your own camera. Here are the final camera design guidelines from Haigh-Hutchinson's textbook, see the previous articles in this series for more of this wisdom.
For the purpose of keeping this discussion quick and to the point, I have chosen to focus on mouse control schemes only. This is a quick primer on how to start your own camera. Here are the final camera design guidelines from Haigh-Hutchinson's textbook, see the previous articles in this series for more of this wisdom.
- "Limit the reorientation speed of the camera. Unless it is under direct player control, rapid or discontinuous reorientation of the camera is disorienting and confusing. Reorientation of the camera causes the entire rendered view of the world to be redrawn; since the direction in which the camera is facing (through the lens as it is often called) determines the part of the world to be drawn. By limiting the velocity of this reorientation, this effect can be minimized. In third person cameras, this may be at a cost of losing sight of the target object for a short period. Instantaneous reorientation is permissible when the cut is made in an obvious fashion such as in combination with a repositioning of the camera, but only when the new orientation is retained for a sufficient period to allow the player to understand the new situation. Retention of the player control reference frame... can assist in this regard. Still, instant reorientation should occur infrequently, and preferably not in quick succession. Reorientation to a new desired heading should usually prefer the shortest angular direction...
- Retain control reference frames after rapid or instantaneous camera motion. With third person camera systems using a camera-relative control reference frame, instant or rapid camera motion will potentially disorient the player. This often results in unintended player character motion, possibly resulting in the demise of the player character. At best, this is merely frustrating; at worst it can induce a desire on the player to throw the controller across the room in annoyance. If the control change occurs at the threshold of a game area, it may in fact cause the player character to cross back into the previous area, possible forcing a load delay and yet another control reference change."
Controlling reorientation speed for the camera

Attenuation variables control the reorientation speed: the max is set to 10, the constant 5, and the modifier 1 to mimic the original speed.
There are six variables for the mouse reorientation speed alone. Three for Yaw Rate and three for Pitch Rate corresponding to the horizontal and vertical movements of the mouse, respectively.
The eye icon beside the Attenuation Modifiers indicate they can be changed in the editor and altered during the game. The Max Attenuation values are set to prevent our math operations from creating dangerous or unpredictable results.
Finally, the Attenuation Constants are where we apply our true limitations on the reorientation speed. These are set before run-time from the Defaults for the Third Person Character Blueprint. With the set up described in the pictures above, we are reducing the input scale by 5, and then using the constant to multiply it by 5 to bring it back up to the original reorientation speed for both yaw and pitch.
When the gameplay and world designs become clearer over the course of production, we can now easily limit the reorientation speed of the camera.
Remapping Control Reference Frames

John Nesky discusses how a camera cuts that remap directional controls can be avoided. Click to see his "50 Camera Mistakes" talk.
Two games that are notorious for breaking the "control reference frame" guidelines are Fallout 3 and 4. When you enter the wasteland from a building (in third person camera), you are often facing your character head on. This means your controls are pointing you back the way you came. They do offer a basic solution to this: play the game in first person perspective.
The default settings for Unreal third person projects also break these rules, specifically as described by Camera Mistake #18 from John Nesky's talk, reflecting on his experiences designing the camera for Journey.
As I am not an engineer and cannot create code to manage the cameras I have to do a few hacky tricks and remapping the directional controls is one of these times. The issue here is that the main camera viewport typically determines the control orientation, but we have no options to maintain the player controls if we do a sudden cut with this system. So we will keep the old camera as a control reference and find a way to move the avatar with its directional controls rather than the main viewport camera after a quick cut from one camera to the next.
(Since completing this exercise, I have learned a little bit more about controller reference frames and there relationship with the Controller. See the conclusion for a suggestion on how this could be done even easier than described here.)

This diagram shows an example of remapping directional controls after a change in camera from the blue camera to the black camera.
In this example the player is moving their avatar forward towards the stairs using the blue camera, but the camera changes to the black camera to face a surprise attacker. There should be a delay in the movement control system in order to give the player time to adjust, but I assumed (wrongly) that the controller updates to the new black camera control reference frame.
To avoid disorienting the player, we must keep the old control reference frame by continuing to use the old camera while showing a view from the new camera overlayed on top of it.
After a short duration, the old camera will snap to the location of the new camera and the overlay will be removed, restoring a normal relationship between the viewport and the control reference frame.
 An example of remapping directional controls from Journey (from blue to black) | Note: the tutorial in this post describes the transition from a follow camera to another camera that is attached to the player; however, this could also apply to a static camera as seen in Journey. |
Creating a second camera
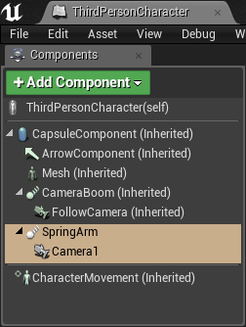 Adding a new camera to ThirdPersonCharacter
 Starting with the default ThirdPersonCharacter:
- Duplicate the CameraBoom to make SpringArm
- Duplicate the FollowCamera to make Camera1
- Parent the Camera1 to the SpringArm
- Change Rotation of SpringArm to x = 0, y = 0, z = -90
- Set all values in Camera Settings of SpringArm false (Use Pawn Control Rotation, Inherit...)
- Set "Auto Activate" boolean false on Camera1
(now this camera will not override FollowCamera)

Camera1 is added perpendicular to the FollowCamera, but it is only a proxy for the SceneCaptureComponent2D that captures images.
Creating a screen overlay from the second camera's perspective
Next, we will add components to get scene capture data and create a new Widget Blueprint to display the capture data in the main viewport, using our HUD class.
Remember to Run in New Editor Window (PIE) to see the correct aspect ratio.
*If you are not seeing your HUD when you play the game try selecting your NewWidgetBlueprint in the Content Browser, then click the <- arrow on the Create Widget to create a reference to it, otherwise the blueprint might not run properly.
Remember to Run in New Editor Window (PIE) to see the correct aspect ratio.
- Click "Add Component" button and create a new SceneCaptureCompenent2D
- Parent the new component to Camera1 (provides scale data to match camera)
- Open the drop down menu for SceneCaptureComponent2D's Texture Target
- Create and save NewTextureRenderTarget2D in the Content folder
- Open NewTextureRenderTarget2D and change Compression Settings to UserInterface2D (RGBA)
- Right click NewTextureRenderTarget2D in Content Browser to create Material
- Create a Widget Blueprint from Content Browser's drop down menu
- Open NewWidgetBlueprint and add an Image that covers the viewport
- Add a reference to NewMaterial under Appearance >> Brush >> Image
- A red message will display, click it to "Change the Material Domain"
- Find your HUD class using Project Settings >> Maps and Modes
- Create a new one if Default Modes >> Selected GameMode >> HUD Class is HUD
- In the NewHUD blueprint after Event BeginPlay, add a Create Widget
- Select NewWidgetBlueprint* in the Create Widget's Class drop down menu
- Create an Add to Viewport node, and link it's Target reference to Return Value
- To improve the image quality, open NewTextureRenderTarget2D and set
Size X = 1920
Size Y = 1080 (or adjust for the appropriate screen size and resolution)
*If you are not seeing your HUD when you play the game try selecting your NewWidgetBlueprint in the Content Browser, then click the <- arrow on the Create Widget to create a reference to it, otherwise the blueprint might not run properly.

This is the result of steps 13-15 from the instructions above, which display the overlay on the viewport when the game starts
Toggling the screen overlay on and off
So far, we created a game that is difficult to play because it defies expectations so now let's hide our overlay until we are about to change the camera. We only want the forward vector for the avatars movements to be perpendicular to the camera when the player expects the forward vector to be perpendicular.
Open your character blueprint (for my example project, it is ThirdPersonCharacter):
Open your character blueprint (for my example project, it is ThirdPersonCharacter):
- Create boolean variable IsDelayingCameraReferenceFrameUpdate
- Set IsDelayingCameraReferenceFrameUpdate true when 'E' key is pressed
- Set IsDelayingCameraReferenceFrameUpdate false when 'E' key is released

This blueprint responds to a variable change on the player character by turning on or off the widget that shows the alternate camera view.
Back in the NewHUD Blueprint:
- Break the link between Create Widget and Add to Viewport to remove overlay
- Get Player Character and Cast to ThirdPersonCharacter
- If the Cast passes, get the value of IsDelayingCameraReferenceFrameUpdate
- Using a branch, either Add to Viewport (old node) or Remove All Widgets (new)
Applying these changes during a camera transition
The practical application for this occurs when the gameplay requires a sudden shift in perspective. We are approximating this in our example by moving our freely rotating camera to the position of a static camera that maintains a predetermined rotation and distance from the player. The player will still be able to move the camera afterwards, so this is not a complete transition from one camera to another.
In your character blueprint (for my example project, it is ThirdPersonCharacter):
In your character blueprint (for my example project, it is ThirdPersonCharacter):
- Remove the nodes attached to releasing the 'E' key
- Add a delay node with a value of 0.5 seconds or more
- Set IsDelayingCameraReferenceFrameUpdate false after the delay
- Set Control Rotation of the controller so that it rotates 90 degrees about Z axis

After a slight delay, this blueprint disables the overlay widget and rotations the controller for the player avatar.
Conclusion
Once again, I have learned a lot about Unreal by trying to apply these relatively straightforward guidelines - because they are not always straightforward in practice. My assumption that the control scheme changes with the camera was not accurate, and I only realized in the last step that I could have used a Set Active node for Camera1 to achieve the same effect as the overlay with a lot less hassle. I also feel a little wary of my current solution that uses Set Control Rotation to spin the avatar's controller because I believe it could have unwanted effects in a project with complex gameplay already implemented.
If you are reading this after following the steps above, I hope you learned something useful anyways!
If you came here first and want to save time, then I suggest skipping the "Creating a screen overlay..." section and using Set Active for Camera1 instead. This can be used with the Set Control Rotation implementation, howvever, the new active camera (Camera1) will not rotate but the controller will still be able to rotate. You will have to solve the problem by either locking the controller's rotation or integrating this system more closely with movement so that the camera can be changed gracefully.
With any luck, I will find enough time to keep iterating towards a much more graceful solution than the one I have presented here. This wraps up a series that started more than two years ago, and puts an end to the rough early ages of my journey in Unreal. My quality bar and personal expectations (for both my blog's professionalism and my Unreal skills) keep steadily rising so feel free to take a look back through the archives if you ever have any reason to feel intimidated by my knowledge.
Learning takes a lot of time and effort, but stay strong and you will be victorious!

 RSS Feed